Tuesday, December 10, 2013

A&S 50 #4 Natural Dye Experiment

I love improvisational science. It's just about my favorite thing. I think this is why I like food science so much. The materials are readily available, and with some reasonable caution you can have a lot of fun! 


Modern chemical azo-dyes were developed in the 19th century. They were first synthesized from coal tar. Now they're made from petroleum byproducts. Azo dyes are really cool. They come in every color there is and they are really pretty safe to work with. FD&C colorants are azo dyes. But there weren't any man made dyes in the middle ages. They had to be isolated from natural sources and manipulated with mordants to set color. Many natural dyes fade over time although indigo and woad are pretty darn stable. Indigo is one of the few natural dyes still in use today for blue jeans. The mordants are the main reason using man made dyes is generally safer. They can be pretty dangerous. Metals such as iron, aluminum from alum, tin, and copper can be used. Dyes can also be manipulated with acids and bases. I used citric acid and ammonia because they are readily available. Citric is probably not the most period-accurate acid for Europe, but it would have been easy to get in the tropics. Ammonia was produced by allowing urine to go stale. It was a stinky job. Queen Elizabeth I hated the smell of dying operations and dyers so much that it was unlawful for a woad dyer to work or live within 5 miles of one of her residences. She had a lot of residences by the way. Woad (dark blue/European indigo color) is particularly stinky because the plants have to be fermented before they're useful as a dye. 

I went with alum and cream of tartar as pre mordants and ammonia and citric acid as post mordants because they are relatively easy to find in food grade form and relatively safe. Note that ammonia is not food grade, but it is a relatively safe cleaner. Don't eat it. Alum is sold as a firming agent for pickles. It's really not a food. It is toxic in it's pure form. Don't eat that either. However, for a small experiment, I can return my equipment to food use after careful washing. I decided to use turmeric as a dye. It makes a really pretty golden yellow. It's the yellow in Buddhist monk's robes. Although it evidently isn't super light fast.

I used cotton yarn, cotton muslin, cotton/poly shirting, linen, superwash merino and mystery wool for this project. I don't have any silk scraps in my stash at the moment. Half the samples were pretreated with alum/tartar/salt mordant for an hour. The other half was treated with just salt. While that was soaking I prepared my dye. I had some old turmeric. I boiled it in water with a little citric acid added at the end of the hour. I rinsed the mordant out of the samples. I popped them into two separate dye baths, one for each treatment, and let them sit overnight. In the morning I rinsed the dye out and separated it based on treatment. The cotton yarn turned brown during the rinse. This makes me wonder if it was dyed "natural." Half of each treatment group got an ammonia post mordant. The ammonia turns everything a dark rusty brown. I accidentally dripped some ammonia on things that shouldn't have gotten it. :-( But then I thought, if alkaline pH makes it go dark, can I push the color the other way with an acid? Turns out--yes you can! I made some citric acid solution and got the dark spots out. The acids drives turmeric to a bright yellow color. It remains to be see how stable that is though. Curcumin, the pigment in turmeric, goes yellow below pH 7.5 and rusty orange above pH 8.6, similar to phenol red indicator.


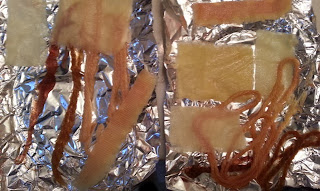
Soaking in the dye, along with ingredients.


After dying, before post mordant.
I only let the ammonia samples sit for about 15 minutes. I was impatient, and it was stinky. The wool was very stable with the color, but the ammonia stripped the dye from the cotton and linen. I suspect with sufficient washing, those samples would go white again. 

After rinsing post mordant out.

This was a fun project, and I am anxious to try other dyes. Color is so much fun! I am working on a tunic dress in the cotton/poly shirting. I think it's going to get a turmeric/alum/acid dying. I'll post a picture of it when I am done.

References:


http://rurification.blogspot.com/2013/02/natural-dye-experiments-part-2.html


Rurification is a super cool blog by the way! Robin is a local artist near my hometown. She was also my spinning teacher. She does cool food stuff too. Hopefully I get to take more classes from her!

Tuesday, November 26, 2013

A&S 50 #3 Brewing Hard Cider

October 20th, 2013 was the first brew day I attended in the Shire of Wurmwald. We had a great time making mead, cordials, infusions, beer, and even brewed soda. I made Spiced Rum and Tuscan Vodka infusion, which I am fairly certain are not period, but they are tasty! I also made ginger lemon beer, a non-alcoholic soda where the carbonation comes from the yeast's metabolism. It's not technically a fermentation because you stop it before the yeast run out of oxygen.

Cider recipe:
1 gallon unpasteurized apple cider
1 packet Lalvin EC - 1118 Yeast

Bring cider to a warm but not boiling temperature. We tested the hot cider on the inside of our wrists in the same fashion which infant formula is warmed. When we couldn't feel the cider, it was the right temperature, around 100F/38C. Pitch the yeast by pouring off some warmed cider into a clean bowl. Sprinkle the yeast over the bowl and allow to bloom for 10 minutes. Pour the yeast back into a cleaned and sanitized fermentation vessel. Set the airlock and allow to ferment until bubbling stops.


November 4th, 2013. Racking the cider is the process of siphoning the finished brew over to another sterile container while leaving the yeast dregs in the original container. This clarifies the finished beverage and stops fermentation. After siphoning, the airlock is reset and the cider ages another two weeks. It was pretty sour at this point, and I was apprehensive about the finished product. The leftovers in the first jug made a great sourdough starter.


November 16th, 2013 The cider is finished settling. It tasted pretty sour so I sweetened it with corn sugar. Corn sugar is glucose derived from corn starch. The type used for brewing is very finely ground so it dissolves well in cold liquid. I think I added about a cup of sugar to the gallon and about 1.5 cups of fireball cinnamon whiskey for flavor. I filled 5 wine bottles at 750 mL each and one beer bottle. The bottles are washed and sterilized with bleach as are the caps and corks. I had fun using the corker and the crown closer. The finished cider has a bit of carbonation to it so it won't have a very long shelf life since the bottles will eventually break due to pressure buildup from fermentation. There is still some yeast suspended in the cider even after racking. 


The cider went over really well at a party a few weeks after bottling. It was really good! There is certainly going to be more brewing in our future. It turned out to be more affordable that I thought it would be. There is a local liquor store in town that also sells home brew supplies. It turns out that $20 will get you the most basic brewing tools. It's nice to have company the the brewing guild too so we had a great opportunity to test out different tools without having to make our own investment in everything.

References:

http://wurmwald.pbworks.com/w/page/1808394/Brewers%27%20Guild

Bonus: I learned to throw an axe and knives on bottle day!

Saturday, November 16, 2013

A&S 50 #2 La Gelosia A 15th Century Dance

Back at the first weekend in November I had the fantastic opportunity to attend the Chrystal Ball at the Barony of Shattered Chrystal. There was a great feast, combat, a play, merchants and dancing. Unfortunately, I also came away with my first bout of SCA plague. I learned and participated in a number of fun dances. I had a friend take a short video of me dancing. I am the excited one in the red apron dress with a white veil/scarf and glasses. I enjoyed the music. I was bouncy. You can see me grooving.


La Gelosia was composed by Domenico in 15th century Italy. I have posted a few relevant links at the bottom. The Kingdom of Meridies has a thorough dance website. The song and dance are about flirtation and jealousy so this was a fun dance to do. There was an opportunity for some good personality and partner interaction.

All in all a super fun weekend! We even had dance cards which I have naturally lost by now so I can't post a photo.

Some things in the works: Brewing, Lucet Cording, Tablet Weaving, My First Set of Garb, Shoes, Handspinning!

References:

http://saltare.meridies.org/dances.php?id=17

http://en.wikipedia.org/wiki/Domenico_da_piacenza

Thursday, November 7, 2013

A&S 50 #1 First Complete Scroll Design

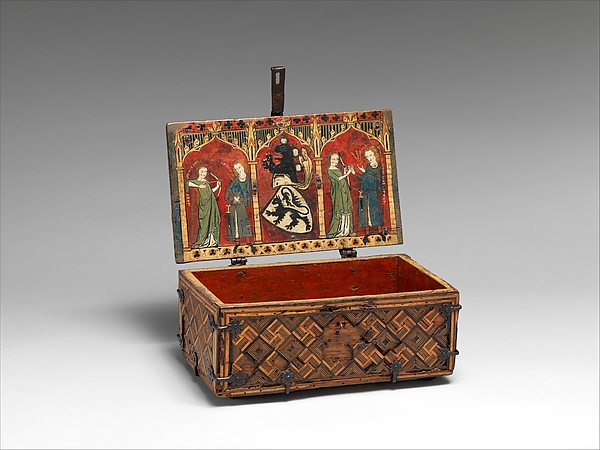
I finished my first complete scroll this week. I started calligraphy when I was about eight years old and have played with it off and on ever since, but I haven't really completed any projects. My first SCA even ever was Inkin' in Lincoln in Bloomington, IL September 28, 2013. I did some lettering and illumination and came away with a backlog scroll assignment. This scroll is the result. Mistress Dairine mor o'uHigin of Atenveldt has an absolutely fantastic set of illumination tutorials, and I have been working through them making pages for a practice book which I may bind at some point. Since this was an award for archery, I used her acanthus leaf tutorial to draw leaf ribbons around an arrow. The versal was based on some her white work and diapering. I used a scene from this small painted chest as inspiration for the archer at the bottom of the page. The box is currently on display at the Metropolitan Museum of Art, access number 50.141.


The Original Chest


Close-up of the Archer

Process: 
I practiced the text several times with markers and cartridge pens. I used a uncial hand based mostly on Margaret Shepherd’s book Learn Calligraphy. I chose uncial because it is the hand I was most comfortable with at the time. It also spans a long time period and large geographical area, although it is best known for works such as the Book of Kells from the British Isles.


Next I sketched my design onto a sheet of 11x14 inch Bristol Paper. I went over the pencil with a 0.005 Sakura pen. I ruled my lines in pencil around 4 nib widths and completed the lettering with a Speedball C-3 nib and Higgins India ink. I later realized there was a mistake and corrected it with margin lettering with a Speedball C-5 nib. I rubricated the name with a Speedball C-1 in Higgins ink. After lettering, I painted in the design using watercolors and gouache for the whitework. I used gold acrylic paint for the gilding. After the piece dried completely, I erased as much of the pencil as I could with a kneadable eraser.


It certainly isn't perfect, but I really enjoyed the process. I had a great time working on this project!

References
Shepherd, M. (2001). Learn calligraphy : The complete book of lettering and design. New York: Broadway Books.
Stirler, G. (2009). Lessons for beginner scribes. Retrieved October 30, 2013, from http://gutenbergscribes.chivalrysports.com/index.shtml


Monday, November 4, 2013

Society for Creative Anachronism A&S 50 Challenge

I have recently joined the Society for Creative Anachronism, and I am choosing to take part in the Arts & Sciences 50th Anniversary Challenge. I am using this blog as a place to document my work and progress through the breadth challenge. I have to try 50 new things before May 1st of 2015, anno societatis 50. We'll see what happens. Hopefully, it's exciting!

http://artsandsciences50.org/index.html A&S 50 Homepage

http://groups.yahoo.com/neo/groups/AandS50ChallengeCommunity/info A&S 50 Official Yahoo Group

http://groups.yahoo.com/neo/groups/MidrealmAandS50Challenge/info A&S 50 Midrealm Official Yahoo Group